Difference between revisions of "Weight Control & Nutrition"
Amycjgrace (talk | contribs) (→Checking Nutrition Content) |
Amycjgrace (talk | contribs) (→Checking Nutrition Content) |
||
| Line 397: | Line 397: | ||
Small white symbols (> and <) appear on each side of any entry which is too high or low. In the above example, for instance, calories and fat are too high, while iron is too low. In this case, you may wish to revise the menus by adding a food high in iron and deleting a portion of food that is high in fat from the day's menus. For help in deciding which foods to add or delete, refer to the food list in ''Appendix B''. | Small white symbols (> and <) appear on each side of any entry which is too high or low. In the above example, for instance, calories and fat are too high, while iron is too low. In this case, you may wish to revise the menus by adding a food high in iron and deleting a portion of food that is high in fat from the day's menus. For help in deciding which foods to add or delete, refer to the food list in ''Appendix B''. | ||
| − | Keep in mind that the figures in the nutritional analyses are estimates. They are based on such factors as the average adult dietary requirements and average nutritional content of foods. In addition, please note the following: | + | Keep in mind that the ''figures in the nutritional analyses are estimates''. They are based on such factors as the average adult dietary requirements and average nutritional content of foods. In addition, please note the following: |
:■ In the menus created by the module, the percentage of vitamin C is usually high, and the amount of vitamin A varies widely from day to day. This is not unusual in a well-balanced diet. | :■ In the menus created by the module, the percentage of vitamin C is usually high, and the amount of vitamin A varies widely from day to day. This is not unusual in a well-balanced diet. | ||
:■ The module occasionally creates daily menus with a low percentage of thiamin and/or iron. An occasional low percentage of thiamin should generally be sufficient to meet the needs of most participants, since the body creates additional thiamin from other nutrients. An occasional low percentage of iron should also be sufficient for adult male participants, since the percentage is based on the higher iron requirements of females (18 mg. per day). Other participants, however, may require an iron supplement. | :■ The module occasionally creates daily menus with a low percentage of thiamin and/or iron. An occasional low percentage of thiamin should generally be sufficient to meet the needs of most participants, since the body creates additional thiamin from other nutrients. An occasional low percentage of iron should also be sufficient for adult male participants, since the percentage is based on the higher iron requirements of females (18 mg. per day). Other participants, however, may require an iron supplement. | ||
| + | |||
| + | :■ If you have a target calorie level of 1500 or less, a vitamin supplement may be recommended by your physician. In addition, if your menus are consistently low or high in any nutrients, check with your physician to make sure your nutritional needs are being met. | ||
| + | |||
| + | Once you finish looking at the nutrient analysis for the day you selected, you may use '''SHIFT [↑]''' and '''SHIFT [↓]''' to see the analyses for the rest of the week. (''Note:'' '''SHIFT [↑]''' cannot be used when the analysis for Sunday's meals is displayed, and '''SHIFT [↓]''' cannot be used when the analysis for Saturday's meals is displayed.) | ||
| + | |||
| + | When you finish checking the menus' nutrient content, press '''SHIFT W''' (BEGIN) to return to the WEIGHT CONTROL & NUTRITION selection list. You can also return to the WEIGHT CONTROL & NUTRITION selection list by pressing '''SHIFT Z''' (BACK) repeatedly. | ||
| + | |||
| + | ===Progress Report=== | ||
| + | |||
| + | The Weight Control & Nutrition module keeps a record of the last 10 updates you made to your weight. (After the tenth update, the oldest updates are replaced as new entries are made.) It is a good idea to update your weight records once a week, following the procedure explained in "Revising Personal Information." | ||
| + | |||
| + | To see your progress report, select option 3, Progress Report, from the WEIGHT CONTROL & NUTRITION selection list. The module then offers you a selection list of all the participants. (As before, the list does not appear if there is only one participant.) Make your selection, and a weight history of the participant then appears. The history shows a table of the 10 most recent updates, as well as the number of pounds lost or gained each week. If the participant has selected a target weight and date, these appear at the bottom of the display, along with the number of pounds that still need to be lost (or gained) before the goal is reached. | ||
| + | |||
| + | Now press '''SHIFT V''' (PROC'D), and the module shows a pair of feet on a scale to depict the participant's weight loss or gain. Press '''SHIFT W''' (BEGIN) to return to the WEIGHT CONTROL & NUTRITION selection list. You can also return to this list by pressing '''SHIFT Z''' (BACK) repeatedly. | ||
| + | |||
| + | ===Saving and Loading Records=== | ||
| + | |||
| + | |||
| + | In order to use your personal information, food selections, and menus in a later session, you need to save the file on a mass storage medium, such as a cassette tape or diskette. Then, when you're ready to use your records again, you can easily load the data into the computer's memory. Note: Any records in the computer's memory that are not saved with a mass storage device will be erased when you return to the master title screen. | ||
| + | |||
| + | Before you can save or load data, the mass storage device must be properly attached to the computer. Consult the User's Reference Guide for information on attaching and using cassette recorders. For other mass storage devices, such as the TI Disk Memory System, refer to the appropriate owner's manual. | ||
| + | |||
| + | ====Saving Your Records==== | ||
| + | |||
| + | To save your records, press '''4''' when the WEIGHT CONTROL & NUTRITION selection list is displayed to select ''Load'', ''Save'', or ''Print Records''. A selection list appears offering you the options of saving, loading, or printing records. | ||
<div id="mp-tfp" style="margin:0.1em 0.4em 0.6em;"></div> | <div id="mp-tfp" style="margin:0.1em 0.4em 0.6em;"></div> | ||
Revision as of 20:11, 16 November 2022
Weight Control & Nutrition is a computer software program created by Texas Instrument (TI) for the TI-99/4A home computer system. It originally sold during the first quarter of 1981 selling for $59.95 (USD). It was sold on Solid State SoftwareTM Command Module cartridge as part number PHM 3021. To be used appropriately, Weight Control & Nutrition requires the use of either a cassette tape recording system or a floppy disk system in order to save information.
| Weight Control & Nutrition | |
|---|---|
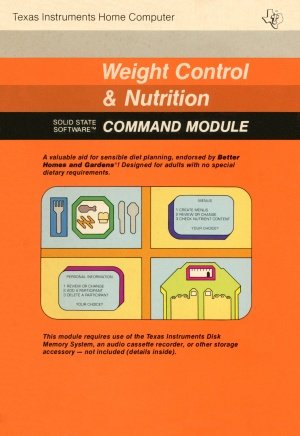 Weight Control & Nutrition Manual (Front Cover) [1] | |
| Publisher(s) | Texas Instruments (TI) |
| Original Retail Price | $59.95 (USD) |
| Part# | PHM 3021 |
| Format(s) | Solid State SoftwareTM Command Module |
| Release | 1981 (1st Quarter) |
| Genre(s) | Nutrition |
Contents
- 1 Advertising Blurbs
- 2 Manual
- 3 Downloads
- 4 References
- 5 External links
Advertising Blurbs
Front Cover of Manual
A valuable aid for sensible diet planning, endorsed by Better Homes and Gardens®! Designed for adults with no special dietary requirements.
Back Cover of Manual
We're all aware of the importance of a good diet. Yet how can we find time in our busy schedules to plan well-balanced meals?
The Weight Control & Nutrition module helps take the guesswork out of planning nutritious meals. Simply enter your personal information and select the foods you want to include in the meals. The computer then creates menus based on the essential nutritional requirements of average adults (age 18 and over). As with any dietary program, you should check with your doctor to make sure the program meets your needs.
Weight Control & Nutrition module features let you:
- ■ Determine your recommended weight range
- ■ Choose a target weight goal
- ■ Create weekly menus based on your weight goal and nutritional needs
- ■ View a nutritional analysis of the menus
The module was developed in cooperation with the staff of Better Homes and Gardens® and features 62 kitchen-tested Better Homes and Gardens® recipes.
Triton Catalog - Spring 1984
Plan balanced meals and improve fitness through nutrition! Your input determines recommended weight range and creates weekly menus tailored to your food preferences and target weight. Menus meet U.S. Recommended Daily Allowances for Adults. (Cassette or Disk Data storage system recommended.)
Manual
About This Program
The Weight Control & Nutrition module is designed to be flexible and easy to use. First, enter personal information about each participant. Up to five people at a time can participate. The computer suggests recommended weight ranges for each person and allows him or her to select a target weight goal. Then, using the selected weight goal, the computer calculates the daily number of calories required in each person's diet.
Once the personal information is entered, you may choose the foods to be included in the menus. Foods may be selected for each person or for the family as a whole. That's all there is to it! You're ready to create a week of menus for an individual or for the entire family!
The Weight Control & Nutrition module is based on widely accepted concepts and research in the areas of nutrition and human physiology. The module program was developed with the assistance of Angela Boren, M.S., R.D., associate professor in the Food and Nutrition Department of Texas Tech University, and Linda Douglas, M.S., R.D., director of the Dietetics Clinic at Texas Tech University Health Sciences Center. The concepts on which the program is based are briefly discussed in the rest of this section.
Proteins, Carbohydrates and Fats
Proteins, carbohydrates, and fats (saturated and unsaturated) are the basic energy-producing nutrients. All food contains at least one of these nutrients, and all three should be included in your daily diet. Based on the Dietary Goals for the United States, developed by the Senate Select Committee on Nutrition and Human Needs, the following proportion for these nutrients is suggested for the average person's daily diet:
| Protein | 15% | |
| Carbohydrates | 55% | |
| Fats, | Saturated | 10% |
| Unsaturated | 20% |
The daily menus created by the Weight Control & Nutrition module include proteins, carbohydrates, and fats in approximately the proportions listed above.
Vitamins and Minerals
Your body requires a wide variety of vitamins and minerals for good health. The Weight Control & Nutrition module takes the following essential vitamins and minerals into consideration when creating menus: vitamin A, vitamin C, niacin, riboflavin, thiamin, iron, and calcium. For each day's menus, the module selects foods which supply these vitamins and minerals approximately in the amounts recommended by the 1980 U.S. RDA (Recommended Dietary Allowance) for adults age 18 and over. The module also provides a nutrient analysis which estimates how closely each day's menus meet the RDA for the above nutrients.
Note that the Weight Control & Nutrition module does not take into consideration all the nutrients needed by the human body. However, it does assign a higher "Food Type" rating to those foods which have a better nutrient content. This procedure, which is discussed below, increases the probability that the menus created by the module supply many of the nutrients you need in your diet.
Nutritional Content of Food
Up to 197 foods can be included in the weekly menus, depending on your food selections. The module assigns each portion of food with a specific nutrient content, using averages compiled by the U.S. Department of Agriculture (USDA).
Each food is also assigned a "Food Type" rating of 1 (high), 2 (middle), or 3 (low). Foods with a higher rating have a better overall nutrient content than do foods with a lower rating. Therefore, when the module is creating menus, it selects Type 1 foods more frequently than Type 2, and Type 2 foods more frequently than Type 3.
The nutrient averages for each food are listed in Appendix B.
Basic Food Groups
The basic food groups are dairy products, breads and cereals, fruits and vegetables, and meat and meat alternatives. According to the USDA, a balanced diet includes daily portions from each of these groups. The menus created by the Weight Control & Nutrition module are based on this concept.
Calories and Body Weight
The module also takes into consideration the relationship between your age, weight, height, and daily calorie requirement.
Calories are units of food energy - the "fuel" your body obtains from the food you eat. According to the USDA and many other authorities, if you take in more calories than you need, the excess energy is stored as fat. Continued overeating thus leads to weight gain, while undereating leads to weight loss. Your weight stays about the same when your calorie intake matches your body's energy needs.
The Weight Control & Nutrition module helps you determine your weight range using a method suggested by the Food and Nutrition Board of the National Academy of Sciences. Three possible weight ranges are suggested for each participant - one for persons with a slim build, another for persons with an average build, and a third for persons with a stocky build. The participant selects a target weight goal based on this information.
To determine your daily calorie requirement, the module first calculates your basal metabolic rate (BMR), using a method developed by Boothby, Berkson, and Dunn.* Then, depending on your selected goal of weight loss, gain, or maintenance, the module calculates your daily calorie target.
All of the above considerations influence the module's creation of menus. Remember, however, that no diet program can ensure good health, since many other factors affect your health. A regular program of exercise, such as the one provided by the Texas Instruments Physical Fitness Command Module, is especially important.
Also remember that these nutritional considerations are based on average figures. No two people have precisely the same nutritional needs. Moreover, since you can revise the menus, the nutritional content of the menus may vary from the above limits. For all of these reasons, the Weight Control & Nutrition program should be viewed as a guide to sensible diet planning, rather than the "last say" about what you should eat.
For more information on the role that nutrition plays in your health, consult the references listed in the Bibliography.
Getting Started
When you select the module, the title sequence for Weight Control & Nutrition begins. You can press any key at this time to go on, or you can wait for the title sequence to end automatically.
Next, two cautionary screens appear. After you read each screen, hold down the SHIFT key and press V (PROC'D) to go on.
The computer now asks you for some preliminary information. First, you are asked to enter today's date. Type in the month, day, and year as two-digit numbers, and then press ENTER. (Example: To enter the date November 5, 1980, type 11 05 80 and press ENTER.)
Then you are asked if you are using a printing device. Press Y for "yes" or N for "no." If you answer "yes," the computer asks DEVICE NAME? If the TI Solid State Thermal Printer is attached to the computer and is turned on, type TP.U as the device name and press ENTER. (Note: If you want the printer to eject only a small amount of blank paper between entries, enter TP.U.S.E as the device name instead of TP.U.) If you are using any other printer, see "Obtaining Printed Copies."
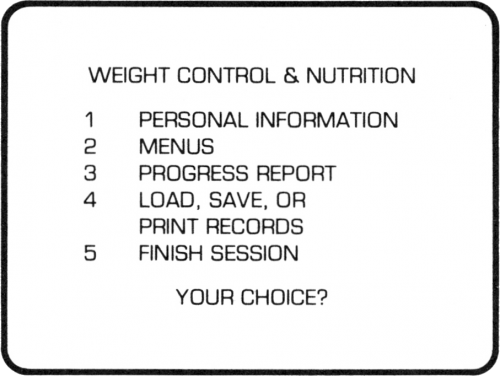
Once you indicate whether or not you're using a printing device, the WEIGHT CONTROL & NUTRITION selection list appears. This selection list offers you five options, as shown below.
- ■ Option 1 allows you to create or revise a file of personal information.
- ■ With option 2, you may create and revise menus and view a nutrient analysis of your menus.
- ■ Option 3 lets you view a progress report on each person in the personal information file.
- ■ Selecting option 4 lets you load, save, or print your records. (You should select this option if you want to load into the computer's memory a file you have saved from a previous session. See "Loading Your Records.)
- ■ Option 5 ends this session with the module.
IMPORTANT: Before you can select option 2 or 3, a complete set of personal information on at least one person must be stored in the computer's memory. If option 2 or 3 is selected before you enter the necessary information, an error message is displayed. To create a file of personal information, press 1.
Personal Information
Selecting option 1 from the WEIGHT CONTROL & NUTRITION selection list causes the PERSONAL INFORMATION selection list to appear.
This list lets you review or change personal information, or add or delete a participant. To set up a file for a participant, press 2 for Add a Participant.
Note: Once you choose the option to add a participant, you should proceed to fill out all of the required information. (Your personal information is completed once you reach the display that calculates your daily calorie requirement.) If you press SHIFT W (BEGIN) before completing the personal information, the information on that participant is lost. Note that SHIFT Z (BACK) is not operative when you are setting up a file of personal information for a new participant.
As discussed previously, the Weight Control & Nutrition module can work with information for up to five people at a time. If you wish to add a participant when the computer already has information on five people, you may erase the information on one of the people from the computer's memory (see "Delete a Participant"), and then add the new participant. Or, you may keep a separate file of the extra participants on a tape or diskette and work with their information in a different session with the module.
Add a Participant
Once you select Add a Participant, the display asks you to enter personal information. Here is a sample display:
The cursor (a flashing question mark) appears to the right of NAME. and you may enter a name up to eight characters long. Type your name and press ENTER. The cursor then appears to the right of SEX (M/F). Type M for "male" or F for "female" and press ENTER.
The cursor then moves to WEIGHT. Type your weight in pounds and press ENTER. Next, fill in the date that you weighed yourself and press ENTER. (This item allows you to update your weight history periodically, as explained in the "Review or Change" section of this manual.)
Next, type in your age in years and press ENTER. Then type and enter your height in feet and inches.
A statement now appears at the bottom of the display, reminding you that the Weight Control & Nutrition module program may not entirely meet your nutritional needs.
Note that the module does not accept personal information that is outside of the normal range for adults. If any of your personal information is not accepted by the module, you may have special dietary needs and should consult your doctor before continuing with the program (see "Special Cases").
Be sure to check the information you have typed on the display before you go on. Your NAME and SEX are established at initial setup. They cannot be changed once you have proceeded to the next display. To correct a mistake, press SHIFT R (REDO) to return the cursor to the top of the display. Then, press the ENTER key to move the cursor over correct entries. When the cursor is positioned over the incorrect entry, retype the entry and press ENTER. When all the information on the display is correct, press SHIFT V (PROC'D).
The display now asks several questions, such as whether or not you are an athlete. Press Y for "yes" or N for "no." As you answer each question, the cursor automatically moves to the next one. If the information indicates that you have special dietary needs, the computer tells you so (see the section on "Special Cases"). If the information you've entered does not indicate a special dietary need, the following display appears.
Activity Level
This display asks you to press 1, 2, or 3 to indicate your average daily activity level. Before answering, look at the Activity Table in Appendix A. Decide what your average level of activity is - light, moderate, or strenuous. Then, fill in the display with the appropriate number and press ENTER. Your daily calorie requirement will be estimated from this information.
Recommended Weight Range and Target Weight
The display now shows three suggested weight ranges for you. If you have a slim build, the first weight range is an appropriate estimate of how much you should weigh. If you have an average build, the second weight range is appropriate for you. If you have a stocky build, the third range is appropriate.
The cursor appears to the right of TARGET WEIGHT, allowing you to type in how much you would like to weigh. Type the weight and press ENTER. The module then calculates a date for you to reach your target weight, based on a weight loss (or gain) of one pound per week. This date appears to the right of TARGET DATE, and the cursor blinks on the first character of the date. You can change the suggested target, if you wish.
The target weight and date that you may choose are limited by certain factors. For instance, you cannot select a target weight that involves a weight loss or gain of more than 30 pounds. Also, you cannot choose a target date which would result in a weight loss or gain of more than two pounds per week. If you make an entry that exceeds these limits, the computer displays a caution and returns the cursor to the beginning of the entry. The warning is displayed until you enter an acceptable target weight and target date.
Note: If you wish to maintain your present weight, simply enter your present weight as the target weight. Then press SHIFT V (PROC'D) to go on to the next display.
Once you enter acceptable targets, the message THIS IS A REASONABLE GOAL appears on the display. You may then press SHIFT V (PROC'D) to go on.
Energy Requirement
The computer now displays your average daily energy requirement, as well as the daily calorie target that is necessary in order to achieve your goal of weight loss, gain, or maintenance. The daily menus created by the module are based on this daily calorie target.
If you wish, you may adjust the calorie target suggested by the module to any figure between 1200 and 3000. To do so, press SHIFT R (REDO). The cursor appears on the suggested figure, and you may type in a figure within the calorie range and press ENTER. If you enter a figure outside this range, the module beeps and waits for you to enter an acceptable figure.
If a warning appears, the module has determined that the daily calorie target needed to reach your weight goal is too low or too high to be nutritionally sound. In this case, your target date must be extended. Press SHIFT V (PROC'D) to return to the display with your target weight and target date. Enter a new target date (and target weight, if desired). allowing yourself several more weeks to reach your weight goal. Then press SHIFT V (PROC'D) to see your recalculated energy requirement.
Note: Even though the module does not create menus at low calorie levels, you can lose additional weight by increasing your general level of activity (for example, by exercising).
When you finish reading the display with your energy requirement, press SHIFT Z (BACK) twice to return to the PERSONAL INFORMATION selection list. You may now wish to review your personal information. If so, press 1 to select Review or Change. If not, press SHIFT Z (BACK) once more to return to the WEIGHT CONTROL & NUTRITION selection list.
Review or Change Personal Information
To review or change personal information, press 1 while the PERSONAL INFORMATION selection list is displayed.
A list appears with the names of the participants for this session. Press the appropriate number key to select the person whose information you wish to review. (If there is information on only one person in the computer's memory, the module automatically "selects" that information and does not display a list.)
The display with information on name, age, sex, etc. now appears, and the cursor blinks on the entry AGE. Press ENTER to skip over correct data. Retype those entries which you wish to revise and then press ENTER. (Remember, NAME and SEX cannot be changed.)
Beneath the WEIGHT entry, the module displays the message TO ADD NEW WEIGHT RECORDS, CHANGE DATE. If you are not updating your weight, just press ENTER to move the cursor to the next item. However, if you have just revised your weight and wish to indicate that the change is an update (rather than a correction), type in the current date and press ENTER. Note that weight updates can only be made in forward chronological order. (You cannot type in a date that is prior to the date shown in the display.) Also, a weight correction or update can only be made to the weight shown in the display - not to any previous weight. Once you make an update, the module stores the update in your weight history record (see "Progress Report").
Note: Anytime you change your weight (a correction or an update). you must press ENTER after typing in a new weight, and you must also press ENTER when the cursor is on the date below your weight entry (even if you are not changing the date). Also, if you enter the same weight in two consecutive weight updates, the scale which follows the progress report may show an incorrect weight.
When you finish revising the information on the display, press SHIFT V (PROC'D) to go on to the next display.
IMPORTANT: Whenever you revise your personal information, be sure to review all of your personal information. The module does not update certain data, such as your daily calorie target, until you proceed through all of your personal information.
Continue to review each display as before, revising each as necessary. If you revise personal information such as your activity level or target weight goal, the module recalculates and displays your daily calorie requirement and target calorie intake. Future menus created for you by the module will be based on this new target figure.
When you finish reading the display with your daily calorie requirement, you are at the end of your personal information. Press SHIFT W (BEGIN) to return to the WEIGHT CONTROL & NUTRITION selection list.
Delete a Participant
To erase this information on any participant (including personal information, food selections, menus, and progress report), select option 3, Delete a Participant, from the PERSONAL INFORMATION selection list.
A selection list then appears with the names of all the people whose information is in the computer's memory for this session. Indicate which participant you wish to delete by pressing the appropriate number key. A statement now appears at the bottom of the display. It tells you the name of the participant you've indicated and asks you to press ENTER to confirm your choice. To delete the information on that participant, press ENTER. Then press SHIFT W (BEGIN) to return to the WEIGHT CONTROL & NUTRITION selection list.
Note: If you decide to keep that person's information, do not press ENTER. Instead, press SHIFT Z (BACK) to return to the PERSONAL INFORMATION selection list.
Special Cases
If you enter personal information which indicates that you have special dietary needs, the module displays a cautionary screen. For instance, if you indicate that you are on a special diet, the following display appears.
- WEIGHT CONTROL & NUTRITION
- THIS PROGRAM IS DESIGNED FOR
- ADULTS WITH NORMAL DIETARY
- NEEDS. YOU SHOULD NOT USE
- THIS PROGRAM WITHOUT YOUR
- DOCTOR'S APPROVAL IF:
- YOU ARE UNDER MEDICAL
- TREATMENT.
- YOU ARE ON A SPECIAL DIET
- SUCH AS LOW SALT OR SUGAR.
- YOU ARE PREGNANT OR
- NURSING.
- YOU ARE UNDER 18 YEARS.
- YOU ARE AN ATHLETE.
- HAVE YOU CHECKED WITH YOUR
- DOCTOR [Y/N)?
Notice that the display asks if you have checked with your doctor. If you have, press Y for "yes," and the program continues. If you press N, the following display appears. (This cautionary display also appears if your height is outside of the normal range for adults.)
The display indicates that you have special dietary needs which the program does not meet. However, the module will create menus for you which are suitable for adults with no special dietary needs. These menus will take your food preferences into account (see "Food Selections).
Be sure to check with your doctor before continuing the program.
When you finish reading the display, press SHIFT Z (BACK) twice to return to the WEIGHT CONTROL & NUTRITION selection list.
Preparing to Create Menus
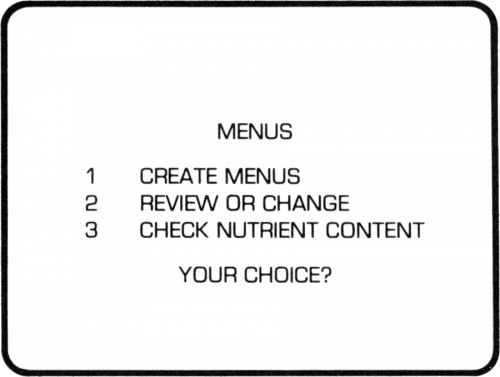
Once you have entered your personal information, you are ready to create menus. While the WEIGHT CONTROL & NUTRITION selection list is displayed, press 2 to select Menus. The MENUS selection list appears next.
If you press 1 for Create Menus, a selection list appears with the names of all participants for this session. (As before, if there is only one participant, the module automatically selects the participant, and a list does not appear.)
Notice that the list includes FAMILY as the final entry. This option lets you choose foods and create menus for the participants as a group. Family menus are based on the average calorie requirements of the participants. Each person is assigned the same foods and the same number of food portions per meal, since the calorie needs are averaged. However, you may also adjust the menus to meet the needs of individual participants (see "Reviewing and Revising Menus").
If you select a single participant rather than the family option, the module lets you choose foods and create menus for that person. The menus are based on the nutritional needs and daily calorie target of the participant. Like family menus, menus for individual participants can also be adjusted.
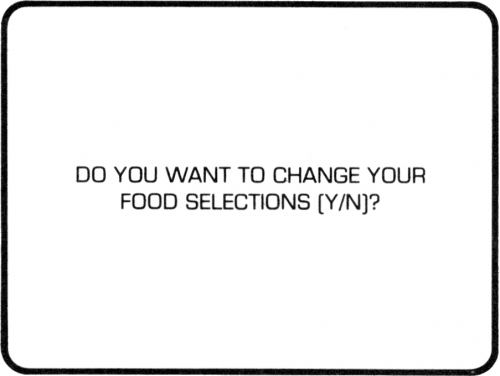
Press the appropriate number key to indicate for whom you want to create menus. The module then asks:
If you have not yet made food selections for the participant or family, the module assumes that you want to include all of the available foods in the menus (see the food list in Appendix B). If you do not wish to change the food selections, press N, and the module immediately begins to create menus.
To look at the food lists and make food selections, press Y.
Food Selections
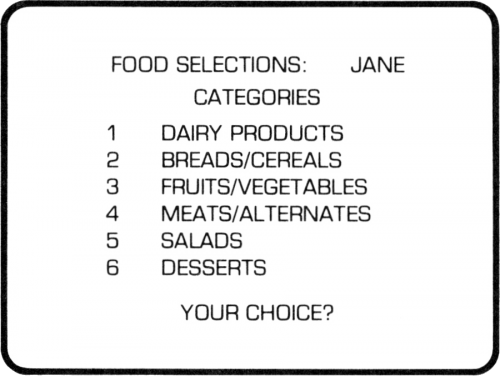
When you indicate that you would like to change your food selections, the FOOD CATEGORIES selection list appears.
The list shows six categories of foods, each of which is divided into one or more food groups. A seventh category - MISCELLANEOUS - does not appear when you're making food selections. However, it does appear when you select the option to revise menus.
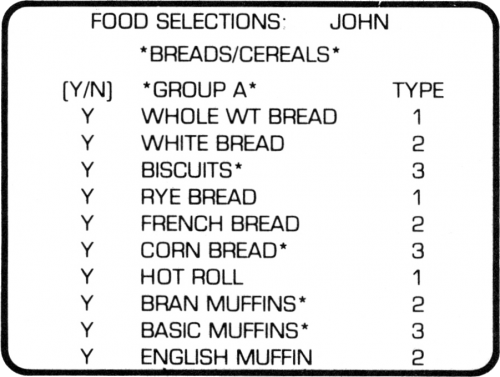
Press the appropriate number to select any food category that you wish to see. The module then displays Group A of the category you selected. For instance, if you press 2 to select BREADS/CEREALS, the following display appears.
Notice that an asterisk appears to the right of some of the foods. There are Better Homes and Gardens® recipes for these foods in Appendix C.
To the left of each food, either a Y for "yes" or a N for "no" is shown, indicating whether or not that food is currently selected for inclusion in the menus. The cursor blinks on the first Y or N. To include that food in the menus, press Y for "yes." If you do not want to include that food in the menus, press N for "no." The cursor automatically moves to the next food on the list. To move the cursor down to a particular food without changing other entries, simply press ENTER repeatedly. You may move the cursor back to the top of the display by pressing SHIFT R (REDO). You may also change all of the selections shown on the display to "Y" by pressing SHIFT T (ERASE).
A Food Type rating of 1, 2, or 3 is shown to the right of each food. As you make your food selections, be sure to select a minimum of three foods per group (except the dairy products category}. All three foods must be Type 1 or Type 2. The module will not proceed unless you select at least one Type 1 or Type 2 food from each food group.
If you fail to do so, the computer displays an error message and returns the cursor to the first entry on the list. You may then change your food selections as necessary. This procedure helps to ensure that the module creates nutritionally balanced menus.
As you choose foods, keep in mind that the fewer foods you choose in any group, the more frequently those foods will appear in your menus. If you like a wide variety of foods in your menus, be sure to select several foods from each group.
To review each food group in the category, press SHIFT [↓] and SHIFT [↑] to display the following or preceding group. Note that SHIFT [↑] cannot be used when the first group of a category is displayed, and SHIFT [↓] cannot be used when the last group is displayed. If the computer beeps when you press SHIFT [↓], you have reached the last food group in that category. The arrow keys cannot be used with the SALADS category, which has only one food group.
Note: Since the foods in the first six food categories are grouped according to their nutritional content, some food groups only contain a few foods, while others contain many.
When you finish your food selections in a category, press SHIFT Z (BACK} to return to the FOOD CATEGORIES selection list. A check mark appears to the left of the category you just revised. You may now select another food category to review, or you may press SHIFT Z (BACK} if you have finished making your food selections.
If you press SHIFT Z (BACK} while the FOOD CATEGORIES list is displayed, the module returns to the display that asks if you want to change your food selections. (Note: The module automatically returns to this display after you review all six food categories.) If the food selections are correct and you are ready to create menus, press N.
Note: If you do not want the module to create menus, press SHIFT Z (BACK) again to return to the MENUS selection list.
Creating Menus
The module begins creating menus for the current week as soon as you press N to indicate that you do not want to change the food selections. The module states on the display for whom the menus are being created. Note: When you create family menus, the module assigns a "copy" of the menus to each participant. This allows each person to adjust his or her meals to suit individual needs.
IMPORTANT: When you create menus for a participant - or the whole family - the new menus replace any menus previously stored in the computer's memory for the participant(s). For example, if you create family menus and then create menus for a single participant, the newly created menu replaces the copy of the family menu assigned to that person. The opposite is also true. If you create menus for individuals and then create family menus, the individuals' menus are replaced by the family menus.
While the module is creating menus, it "counts off" the days as the menus are completed. When all the menus are complete, the module displays the menus for you to review.
Reviewing and Revising Menus
Reviewing Menus
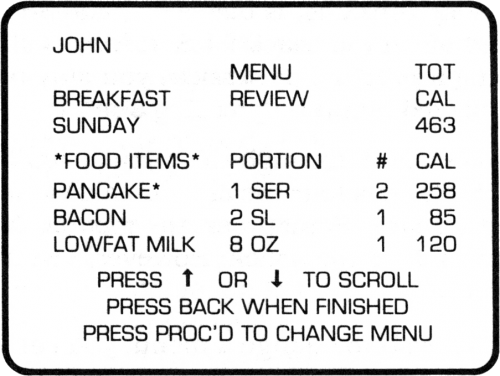
Whenever you create menus or select the Review or Change option from the MENUS selection list, the module displays the menus for you to review. The menus appear in chronological order, beginning with Sunday breakfast.
As shown in the above example, the day, meal, and participant's name appear at the top of the display. If you have just finished creating FAMILY menus, the module shows the menus for one of the participants.
(As noted earlier, the computer stores an identical copy of the family menu under each participant's name.) To the right of each food in the menu, the module shows the portion size, number of portions, and calorie content of that food. For example, the above menu includes two portions of pancakes (1 pancake per portion) and one portion of bacon (two slices per portion). Total calories for the pancakes are 258, and total calories for the bacon are 85.
Notice that the word "pancake" is followed by an asterisk(*). This indicates that there is a Better Homes and Gardens® recipe for pancakes in Appendix C. Whenever a food is marked with an asterisk, the module bases its portion size and calorie count on the appropriate Better Homes and Gardens® recipe.
In the upper right-hand corner of the menu, the module shows the total calorie count for the meal. This figure - and the entire menu - is revised when you add or delete foods.
Press SHIFT [↓] to look at the next menu. Continue to "scroll" through the week's menus using SHIFT [↑] and SHIFT [↓]. (Note: SHIFT [↑] cannot be used when Sunday breakfast is displayed, and SHIFT [↓] cannot be used when the snack for Saturday is shown.) If you are using a printer this session, you may print any displayed menu by pressing SHIFT P.
As you scroll through the menus, you'll notice that each day has four meals - breakfast, lunch, dinner, and a snack. Sometimes, the module does not assign any foods to the snack. However, you may do so, if you wish.
Revising Menus
If you wish to change a menu, you can do so easily. Simply note the day, the meal, and the food portions that you wish to add or delete.
Note: When replacing one food with another in a meal, it is a good idea to substitute foods that are within the same food group (for example, replace a portion of whole milk with a portion of skim milk). This helps keep your menus nutritionally balanced. It is also advisable to select foods with an equal or higher Food Type rating. See Appendix B for a list of the foods and their nutritional content.
When you are ready to begin making revisions, press SHIFT V (PROC'D) while any menu is displayed. A display entitled CHANGE MENU appears, and the computer waits for you to indicate the day and the meal of the first menu you wish to revise. At the lower half of the display, the days of the week appear with corresponding numbers. Referring to this list, type a number from 1 to 7 to select a day and then press ENTER.
The list of days is then replaced by a list of meals with corresponding numbers. Referring to this list. type a number from 1 to 4 to indicate a meal and press ENTER.
The module now displays a list of food categories, as well as the day and meal you selected. Notice that a new food category - MISCELLANEOUS - appears as the seventh entry on the list. The foods in the MISCELLANEOUS category include "extras" that you may wish to add to your meals (such as cream for your coffee or syrup for your pancakes). as well as snack foods (such as potato chips). The module does not include these foods when it creates menus, but you may now add them to this meal, if desired.
Select the category which includes a food that you want to add to or delete from the meal. For instance, if you wish to add an apple to the meal, press 3 to select FRUITSNEGETABLES. If you are not sure about which category a food belongs to, consult the list of foods in Appendix B.
Once you select a category, the module displays Group A of the category you selected. To the left of each food, the module indicates how many portions of the food are included in the meal that you have selected for revision (a zero indicates that no portions of the food are included in this meal). To the right of each food, the module shows the Food Type rating. Here is a sample display:
Use SHIFT [↑] and SHIFT [↓] as necessary to scroll the display to the food group in this category that contains a food which you want to add to or delete from the meal. Then, press ENTER repeatedly to move the cursor over those items that you wish to leave unchanged. When the cursor is positioned to the left of a food you wish to add or delete, type the number of portions you want to include in the meal. To delete a food, just type 0. You may change the portions for all displayed foods to 0 by pressing SHIFT T (ERASE).
Note: Each breakfast, lunch, and dinner menu can include up to five portions of any one food. Breakfast can include a total of ten portions, and lunch and dinner can include a total of eleven portions. Each snack can include up to four portions of food. If these limits are exceeded, the computer beeps and will not go on to any other display until the portions are adjusted. In this case, press SHIFT R (REDO) to return the cursor to the top of the display. Then press ENTER to move the cursor down to the entry which caused the error tone and change the entry. You may then proceed with the program.
When you have made all the changes you wish in this food category, press SHIFT Z (BACK). The module displays the food categories again, and you may select another category and continue your revisions.
When you finish your revisions, you will probably wish to see the revised menu. There are two ways for you to do so. The fastest way is to press SHIFT V (PROC'D) while any food group is displayed. The revised menu appears immediately. You can also return to the revised menu by pressing SHIFT Z (BACK) repeatedly to return to the MENUS selection list, selecting option 2 for Review or Change, and then scrolling through the week's menus to locate the revised menu. With either method, the module displays the revised menu, and the revised total calorie count appears in the upper righthand corner of the display.
After you look at the revised menu, you may use the arrow keys to continue reviewing the week's menus. When you are ready to revise another menu, press SHIFT V (PROC'D) while any menu is displayed to go to the CHANGE MENUS display. Indicate the menu that you wish to revise, and change it by following the same procedure as before. Once you finish reviewing and revising the menus, press SHIFT Z (BACK) repeatedly to return to the MENUS selection list.
When you create menus or revise them, be sure to check the menus' nutrient content.
Checking Nutrition Content
To check the nutrient content of the daily menus, select option 3, Check Nutrient Content, from the MENUS selection list. A selection list now appears with the names of all participants. (As before, the list does not appear if there is only one participant.) Select the participant whose menus you wish to check.
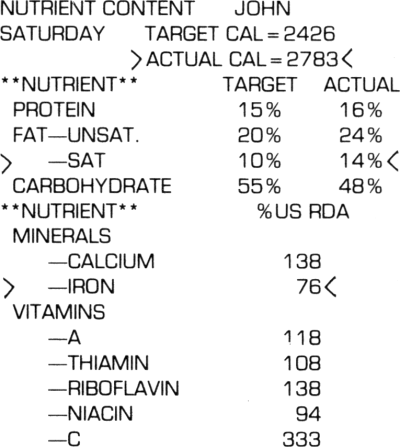
After a moment, the module displays a list of days with corresponding numbers. Type a number from 1 to 7 to indicate the day that you wish to check, and then press ENTER. A nutritional analysis of the menus for that day then appears. Here is a sample display:
The analysis shows the menus' actual total calories, as well as the target calorie intake. The analysis also shows the actual and target proportions of protein, carbohydrate, and fat in the day's menus. Finally, it shows what percentage of the U.S. RDA (Recommended Dietary Allowance) the menus supply for seven essential vitamins and minerals. Note: Although the target percentages of protein, fats, and carbohydrate add up to 100%, the actual percentages may not add up to exactly 100%.
Small white symbols (> and <) appear on each side of any entry which is too high or low. In the above example, for instance, calories and fat are too high, while iron is too low. In this case, you may wish to revise the menus by adding a food high in iron and deleting a portion of food that is high in fat from the day's menus. For help in deciding which foods to add or delete, refer to the food list in Appendix B.
Keep in mind that the figures in the nutritional analyses are estimates. They are based on such factors as the average adult dietary requirements and average nutritional content of foods. In addition, please note the following:
- ■ In the menus created by the module, the percentage of vitamin C is usually high, and the amount of vitamin A varies widely from day to day. This is not unusual in a well-balanced diet.
- ■ The module occasionally creates daily menus with a low percentage of thiamin and/or iron. An occasional low percentage of thiamin should generally be sufficient to meet the needs of most participants, since the body creates additional thiamin from other nutrients. An occasional low percentage of iron should also be sufficient for adult male participants, since the percentage is based on the higher iron requirements of females (18 mg. per day). Other participants, however, may require an iron supplement.
- ■ If you have a target calorie level of 1500 or less, a vitamin supplement may be recommended by your physician. In addition, if your menus are consistently low or high in any nutrients, check with your physician to make sure your nutritional needs are being met.
Once you finish looking at the nutrient analysis for the day you selected, you may use SHIFT [↑] and SHIFT [↓] to see the analyses for the rest of the week. (Note: SHIFT [↑] cannot be used when the analysis for Sunday's meals is displayed, and SHIFT [↓] cannot be used when the analysis for Saturday's meals is displayed.)
When you finish checking the menus' nutrient content, press SHIFT W (BEGIN) to return to the WEIGHT CONTROL & NUTRITION selection list. You can also return to the WEIGHT CONTROL & NUTRITION selection list by pressing SHIFT Z (BACK) repeatedly.
Progress Report
The Weight Control & Nutrition module keeps a record of the last 10 updates you made to your weight. (After the tenth update, the oldest updates are replaced as new entries are made.) It is a good idea to update your weight records once a week, following the procedure explained in "Revising Personal Information."
To see your progress report, select option 3, Progress Report, from the WEIGHT CONTROL & NUTRITION selection list. The module then offers you a selection list of all the participants. (As before, the list does not appear if there is only one participant.) Make your selection, and a weight history of the participant then appears. The history shows a table of the 10 most recent updates, as well as the number of pounds lost or gained each week. If the participant has selected a target weight and date, these appear at the bottom of the display, along with the number of pounds that still need to be lost (or gained) before the goal is reached.
Now press SHIFT V (PROC'D), and the module shows a pair of feet on a scale to depict the participant's weight loss or gain. Press SHIFT W (BEGIN) to return to the WEIGHT CONTROL & NUTRITION selection list. You can also return to this list by pressing SHIFT Z (BACK) repeatedly.
Saving and Loading Records
In order to use your personal information, food selections, and menus in a later session, you need to save the file on a mass storage medium, such as a cassette tape or diskette. Then, when you're ready to use your records again, you can easily load the data into the computer's memory. Note: Any records in the computer's memory that are not saved with a mass storage device will be erased when you return to the master title screen.
Before you can save or load data, the mass storage device must be properly attached to the computer. Consult the User's Reference Guide for information on attaching and using cassette recorders. For other mass storage devices, such as the TI Disk Memory System, refer to the appropriate owner's manual.
Saving Your Records
To save your records, press 4 when the WEIGHT CONTROL & NUTRITION selection list is displayed to select Load, Save, or Print Records. A selection list appears offering you the options of saving, loading, or printing records.
